Wednesday, November 6, 2013

Laundry Room


We just went from one giant construction project to the next here without really taking a minute to breathe. From the screen porch to starting the laundry room, we really are starting to make this house our home. It’s amazing to see the imprint previous owners have made on this house and how we are molding it to fit our desires. The house never had a laundry room; which is hard to believe this day and age, but I guess in the 1960’s it wasn’t a desirable room to have like it is now.  

We have a double car garage and two closets off the garage. Both of them are a good size and share the same wall as the screen porch. The closet nearest shares a wall with the kitchen and is where the washer and dryer are. The door from the garage goes into the kitchen and this entrance is used more than the front door. Also that door into the kitchen is right in the middle of the wall, so there’s no space for a kitchen table; making one whole corner of the kitchen completely wasted space. We use to have a chair in that corner. The most exciting and best solution for having a laundry/mudroom in the house and making the kitchen space more usable was to open up the closet to the kitchen and finish it out. Here are some pictures of what the kitchen and closet off the garage looked like before: 

kitchen wall with garage door entrance

where the laundry room door will be (new entrance)


Washer on one side of garage closet
A HUGE side project, moving the electrical panel. It was conveniently placed right where we needed to put the door. So we got a larger panel and moved it to the garage. Larger panel=hot tub being able to be hooked up! yeahhhhh!!! one project leads to another, leads to another...leads to anoth..er...

Dryer on the other side of garage closet
The window in the closet looks out over the screen porch, so we took that window out and put a door there. Now we will have access to the porch without having to go outside.

window out onto porch
framing it for the door!
framing the floor!
Time for demolition, after the electrical panel was moved, floor put in and exterior doors to garage and screen porch were installed. So fun!
Just a lil scary knocking a hole in your house!
He did so good!

All framed out and it's night time now...big day

bye bye old entrance!
You can also see in the above picture the door going out onto the screen porch. We sheet rocked where the old door out to the garage use to be. Put in insulation in the laundry room and kitchen, and the washer and dryer are on the same side now. 


Another laundry room update soon to come as hubby is already making more progress as we speak! 

Monday, November 4, 2013

Porch Bed


We built a hanging porch bed for the screen porch and love it! Here’s the design we came up with:


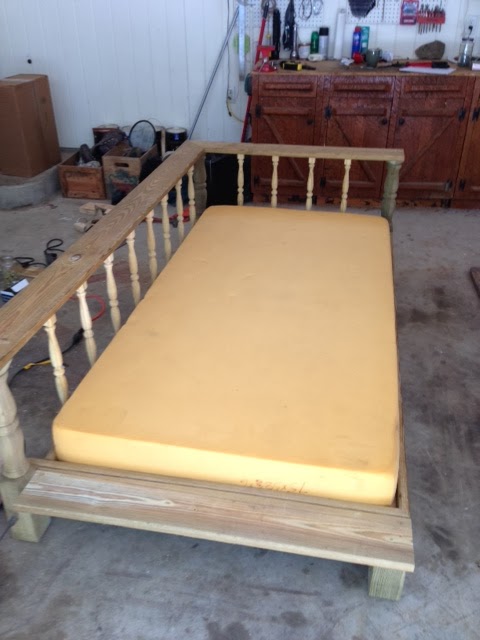
We kept the left side open and put a lower ledge on it, flush with the frame, so that you have space to completely stretch out or place a lovely beverage while lounging. It also makes it look less like a day bed and more like a giant chaise lounge.

Lumber and Supplies List:
3 turned posts
12 spindles
1 sheet of 3/8” plywood
2 of 6’x2”x4”s-span the middle
3 of 6’x1”x4”- support the sides and ends of the plywood
5/4"x6"-leftover decking boards
4x4 -for front left support (instead lieu of turned post)
4x4’s to hang from ceiling
3/4inch manila rope


Most of the lumber we had left over from building the screen 
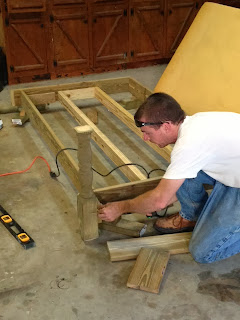
porch, we had to buy the turned posts, spindles and sheet of plywood. First Ryan built the frame with left over 5/4" x 6" deck boards, with 2x4's in between and 1x4's on the sides to support the plywood.

On the front left, since it’s going to be open without a post, we used a 4x4 for support. Then we took the 3 turned posts and cut the ball top off each of them and cut the bottoms of them at a 45 degree angle on all four sides.  

This gave the posts a little more shape and makes them look more finished instead of just bluntly cutting them off straight. Then he mounted the 3 posts in each corner except for the front left. Then take the 5/4"x6" decking boards and cut them to length to sit on top of the posts. Making a back/arm rest. We also cut another 5/4"x6" decking board to place at the open end for that lovely beverage holder. 
attaching the posts

5/4"x6" decking boards
 Take the spindles and evenly space them out along the back and right side of the bed.


Cut the 3/8” plywood to fit the frame. 

Drill holes in all four corners of the 5/4"x6"decking boards large enough for ¾ inch rope to go through. Then drill holes horizontally in all 4 posts. The rope will go through the 5/4"x6" decking boards and down through the post for secured support. 

We already had a twin foam mattress and to protect it I bought a plastic zip mattress cover from Bed, Bath and Beyond. 

Now on to the fun part! In order to hang the bed from our ceiling, since it’s recessed in the rafters, we used two 4x4’s to go in between the rafter beams and secured those with really long screws, like 8” long, from the other side of the beam all the way through the 4x4.This thing isn’t going anywhere and my engineer assured me it could hold close to a ton. Then loop the rope over the 4x4 in the ceiling and tie a knot, then thread it down through the drilled holes and tie a knot at the bottom, do this on all four sides… and here it is hanging! 


Of course, decorate with a fitted sheet and pretty pillows! We LOVE it and it’s the perfect place for an afternoon nap!  


Tuesday, October 29, 2013

Chandelier make-over

Do you have an old light fixture or chandelier that you’re trading out and not sure what to do with? Sure you can sell it on craigslist or send it to Goodwill or throw it out…OR you can revamp it! It could become a candle holder, a candle-labra, a terrarium…the possibilities are endless.

My dear Meme just so happened to be switching out some of the light fixtures in her house and she knows me well enough to hold on to stuff and ask me before she chunks it. Here's one of the two that she was getting rid of:


I lost the picture of what the chandelier looked like originally..but this one is almost identical -thanks to handy Google.
I wanted a chandelier to hang over the paisley table on the screen porch and knew that this would be perfect to transform into a candle chandelier. Ryan took out all the wiring and since it was two tiers it was a little longer than necessary. So, he unthreaded all the separate brass pieces and we were able to “re-build” it by just threading back on the pieces I wanted to keep. It made it shorter and put the two tiers closer together. I wanted to do this for functionality reasons too since I would be putting real candlesticks in it, I didn’t want one candles flame right under another candle, thus the end result probably being a melting candle hot wax mess. A hot mess.  The chandelier had faux candle sticks in it and once they were removed with all the wiring, it was the perfect size to put a candle stick or tealight down in…it even has a rim for drips. Perfect!
We bought a new chain to hang it with and painted the chain and the chandelier with Rustoleum Oil Rubbed Bronze.  And here it is…


on the screen porch

Chandeliers just like this one are very popular and can be found for next to nothing at thrift stores, garage sales, etc. Pottery Barn and other high end companies are selling a look just like these for $50-$250 and I made this one for the cost of the can of spray paint! I hope I’ve inspired you to go out, scavenge, and make your own before you spend a lot of $money$ buying one! Anything is possible! 

p.s. screen porch is obviously done, and has been for a while, I'm so bad about updating this thing...post coming soon. :)


Monday, April 1, 2013

Bird Bath

A long time ago my dear friend, Alaina, over at Recycled Interiors, gave me this vintage, yellow, glass dish and I love it! I wasn’t quite sure what to do with it though...I had it on my kitchen counter for a while but felt like it could have so much more potential somewhere else. It just seemed to be over looked.
For some reason, one day when we were at Goodwill (how most of our stories start out…), I got on this kick about silverware. They had a plastic bin full of knives, spoons, forks..all for like 10 cents each. I just couldn’t get over it and thought, there’s got to be something cool I can do with all this decorative silver. So I bought a bag full of knives and spoons. I left them in the garage for a while not having a clue what I was going to do with all of them and then a creative spark fired off in my brain! I could bend them and make a frame to hold the glass dish for a bird bath!  
I picked out some of the prettier knives...

detail of knife
 ...and bent them all at the same place/angle with a clamp and hammer and the help of my husbands muscles. Definitely wear hearing protection-it got very loud. I measured the circumference of the dish so I would know where to bend my knives so that the dish would fit in snug. 
Bent knives
 Then in the “blade” part of the knife, Ryan drilled a hole in all 6 knives at the same spot. After that we threaded a bolt through them to hold them all together. We had a hollow silver metal pole laying in the garage that already had a female end in it (Ryan used a size bolt that would thread into it). We cut off the pole at about 3.5 feet and I spray painted it black. Then we threaded the bolt with all the knives onto the pole. After that it was ready to be stuck in the ground. 


And here it is finished with the dish - a vintage bird bath! The birds love it, it’s just the right depth for them to get in and it adds a little character to my garden.


Another great example of recycling the materials you have!
and speaking of garden...my tulips are blooming!

Spring is here!


Tuesday, March 26, 2013

Lace Cowl

I don’t know how to knit, even though I would love to learn how I haven’t taken the time to learn, so I resulted in plan B for making a cowl (an endless scarf).  Plan B=sewing! If you are a beginner seamstress like me, then you will love this project. It’s easy and the end result is fashionably fabulous! I chose to use two different types of fabrics to make it a little more interesting, so I went with a gray cotton knit and lace. The cotton knit is super soft and comfy.

What you need:
2 different types of fabric (I bought enough fabric to make 8 cowls)
Scissors
Ruler
Sewing machine

1.       Lay the “gray” fabric (the fabric you want to use more of) out on a flat surface and cut it in strips. My strips were 4’6’’ long by 18’’ wide.  I know it’s a little odd of a number, but I gave myself a couple inches of breathing room for sewing so I would have enough room for a hem. (When the cotton knit fabric is cut, the edges tend to roll a little…at first I thought it would be a problem but it actually ended up helping me keep a straight stitch along the edge.)


2.       Then I did the same thing for my “lace” fabric (the accent piece of fabric), lay it out and cut in strips 16” long and 18” wide.


 3.       Line up the short edge (end) of your “gray” fabric with the short edge (end) of your “lace” fabric. It looks like this:

and sew them together. I sewed them together about an inch in.

Ryan made me a sweat band since I was working so hard

So now you just have a strip of the “gray” and “lace” sewn together. The strip should be the same width all the way down.

4.       Fold the fabric strip lengthwise with the hem of the stitch you just made showing, (facing out).

5.       Run a stitch all the way down the open folded side of the “gray” fabric and “lace” fabric-once you have done this, you should have created a long tube that’s open at both ends.


 6.       Now flip your fabric tube outside in-so that your pretty edges are showing.

Pretty seam, success!

7.       Take the “lace” end of the tube and feed about an inch of it onto the “gray” end of the tube. (I made sure that my seams are lined up so it looks like the stitches are even.) This makes a circle-endless scarf! See, it’s all coming together-just one more step!


8.       Run a stitch width wise across the part you just fed into in step 7.

 
9.       You’re done! Enjoy your no-knit cowl!


Pretty simple! When mine was complete it measured out to be 2’ 10’’ long and 9’’ wide. It’s a big enough loop that you can wrap it around your neck twice to get a cool layered look. This is the second thing I have ever sewn; it was good practice, fun, and definitely do-able!
I gave them out as gifts for Christmas and everyone loved them. They look fabulous on and will add swag to any outfit. Here are a few of them...
Aunt Carol

Me
Meme
My Sis-Sara

Want one?