Showing posts with label Reclaimed Wood. Show all posts

Monday, October 29, 2012

I love rocking chairs!

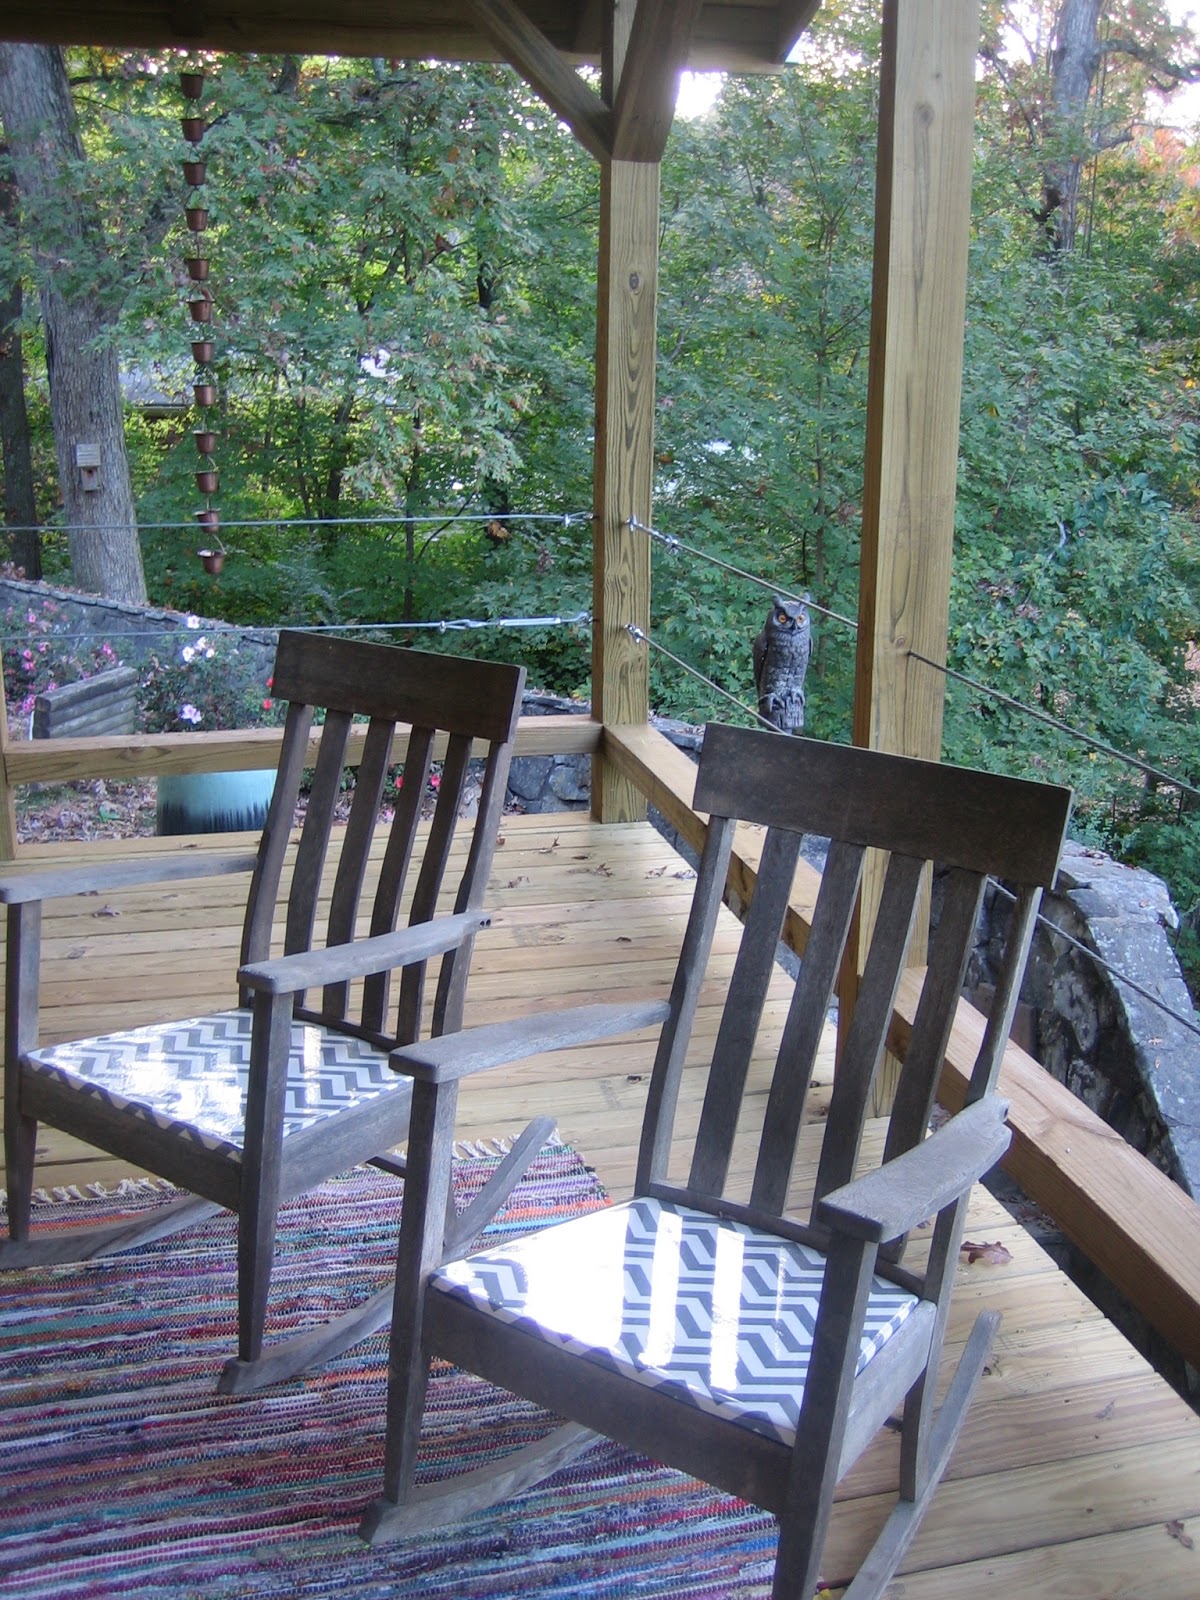
I haven’t updated in a while because we have been so busy working on projects! When the blog is slow….the house is busy!!! This was me and my husband’s first time going to the Endless Yard Sale and it was awesome. We found some pretty cool things for great prices…needless to say, we were in heaven! I found these 2 really beat up old rocking chairs that needed some love…

I managed to talk the guy down to $15 for both!!! Score!

The bottoms had rotted ply-wood with a foam/spring vinyl seat which was pretty gross. 

Some parts of the legs and back were chipped and they tried to fix it back together with great stuff. We made a template from the old bottom and replaced it with a fresh new piece of plywood. 

I scraped/sanded down the wood and got all the great stuff off; then just used good ‘ol wood glue and clamps to put it back together. 


At first I thought I wanted to cushion the seats again…but since they were going outside on the porch I chose not to. And then I thought about painting the plywood but thought painted plywood might not look too great. So I just chose a really cute chevron fabric and covered the plywood using my beloved staple gun. Then I bought some clear vinyl, medium thickness (found in the fabric section) to cover on top of the fabric.
I loved the natural worn look of the wood so I just left that be, no paint needed for this project!
And here they are:


The vinyl makes them much more durable and so easy to clean! Don’t have to worry about stains or rain water-they just wipe right off!

Rocking chair find #2: I wanted an upholstered comfy rocking chair for the living room and found one at a thrift store for $15.
Let me rewind…this was my inspiration, from Anthropologie:
and it cost a ridiculous amount of money.

 So when I found this one I was really excited.

 I didn’t care for the red shiny cherry finish, and the rocker part was really chewed up on the front and back, so I sanded the entire chair down…(I feel like I am always sanding!) 

after sanding-everything is smooth with no chew marks
 Then I just brushed it with some Minwax Kona stain that I already had. It gave it a darker flat finish, which is what I wanted. 
 I found some affordable Ikat fabric at JoAnn's that I fell in love with and had it reupholstered for next to nothing and they did a fantastic job! I had buttons made and added to the back cushion of the rocker for some definition and detail. Here's how it turned out: 


That's all my rockers...and there's more projects to come, bye for now! :)

Wednesday, July 11, 2012

Kitchen Chalkboard

In our kitchen we have a fireplace with a long brick wall and I needed something to break up the space. Big chalkboards are so much fun and I thought it would be great for the kitchen to write notes on. I found this old dresser mirror at Goodwill for $10 and figured I could do something with it, plus I loved the size of it.

I took the mirror out and flipped it over. So I painted the chalkboard paint on the backside of the mirror (if I ever want to use the mirror side as a mirror I can). Before painting the frame I had to sand it to get the finish off, so the paint would stick/not scratch off. First I painted the mirror blue (with a paint sample I already had)...

 But I didn't like the way the blue looked in the kitchen at all. I have a lot of earthy tones in there, green, burnt orange, red, etc...so I decided to paint the mirror green. On the left is the mirror painted with chalkboard paint. It took two coats to really cover it well. This is the chalkboard paint I used and it's great quality:


...and here it is finished and hanging :) It breaks up the brick wall and it's so fun to write on too! (I think my husband has written on it more than I have!)


Dresser Mirror: $10
Chalkboard Paint: $10.97 at Home Depot
Sample Paint-Jade Romanesque: $3.00 at Ace Hardware
Total Cost: $23.97


Sunday, July 8, 2012

China Hutch

My Meme gave me her china hutch from when her and my Papa were first married. She still uses the dining room table, but the hutch was down in the basement. With her permission of course, I gave it a little makeover! 

Here is the hutch before: 

 The hutch was definitely used and well loved, it had a couple of places that were chipped (you can kinda see on the front corner in the picture above) and the legs were a little scratched up. 
The two pieces are separate, so I took them apart and primed both of them (instead of sanding). I used Kilz odorless primer.  The vinyl strip came off the front, so we filled it in the wood filler. Same with all the chips on the both pieces. After the wood filler dried (the next day) I sanded it down to smooth it out/make it even with the rest of the wood.

After priming, I painted both pieces white and the back of the shelves/sides of the drawers teal. The white I used was: Ace Essence, Satin, Casablanca
The teal I used was: Clark and Kensington, Turquoise Bay
and here it is all finished!


I painted a heart around a pretty piece of the wood grain to show the original :)
 

I am soooo excited about the way it turned out, I love it!
Thank you, Meme. 

Hutch: priceless
Primer: already had 
Quart of teal paint-Free (promo deal coupon from Ace Hardware)
Gallon of white paint: around $20
Total Cost: around $20 (however much the white paint was)

Friday, May 25, 2012

Hardwood Door Mat

When my parents built their house 12 years ago they put hardwood floors down in the kitchen and had leftover scraps. Dad found the leftover scraps when he was cleaning out his workroom and of course, Ryan and I snatched them up!
some of the left over pieces
 We wanted to make a doormat, something like this:

This one was made with rope and we soon realized that since there's no rigidity in rope it would pinch our little feet-sies. (One thing you should know about us, we are almost always barefoot. I for one, don't like to wear shoes if I can help it.) My husband, being the problem solver he is, never ceases to amaze me and came up with using cable instead. We bought 10 feet of thin cable from Ace Hardware.

First we cut the scraps of wood all to the same length and then stained them using Minwax, Kona. (We had stain left over from the Crate Shelves project.) Ryan drilled holes all the way through the sides of each slat of wood and through the top, fed the cable through, knotting it each time he passed it through the hole.

Then he would pull back on the wire so the knot would fit/sit tightly in the hole, and so on...until all the boards were threaded. This was no easy task, it took him a while to master how to tie the perfect tight knot and measure it out between each board.


The scraps of wood were enough to make two door mats and we gave one do our dear friends Rob and Alaina. Check her blog out sometime: http://recycledinteriors.blogspot.com.

Anyways, this is how they turned out! We love how the shiny cable looks against the dark wood.


Total cost of project for two mats: $10
$10 thin cable from Ace


Thursday, May 17, 2012

dock coffee table


Hey y'all! Ryan and I have really gotten into this re-claimed wood thing and are having so much fun with it. It's amazing what you can make out of something that looks unsalvageable. We were out kayaking on the river and found a piece of a dock that floated away and been abandoned for a long time and I thought it would make the coolest coffee table. Ryan was on board (get it?) and the salvaging began! Getting is home was the tricky part b/c it was SO heavy and hard to tow...but we managed!
We got it home and had to take out all the icky styrofoam which was growing trees in it!
  We took all the boards off the top to get rid of the rusty bolts and cut off the bottom steel to give it legs. Then used a wire wheel to clean the steel (it too was covered in gunk and rust). To finish off the steel frame we sprayed a clear coat of Rust-oleum Crystal Clear Enamel. And sanded the boards down to get rid of all the splinters. 
We re-stained the wood with a coat of semi-transparent wood stain for $5. (at Ace Hardware, in their paint section, they have clearance cans of paint and stains that's been returned mainly b/c people didn't like the color). Ryan added some stainless steel feet with rubber stoppers so the steel frame wouldn't scratch up the stone.

...and here it is done! 


now we have an awesome, functional outdoor coffee table/bench that is pretty much in-destructible!
Total cost of project: $19
$5 on stain
$4 Rust-oleum Crystal Clear Enamel
$10 on feet 


Wednesday, May 9, 2012

Crate Shelves

As with any new house, we have a blank canvas to work with. We have a fireplace in our kitchen, so I wanted to create a reading nook. In the previous post, we made the stump table to go next to the comfy overstuffed chair in the kitchen and the nook was started! I wanted a book shelf for the empty wall on the right side and I love this look:
To buy these shelves made are really expensive and I saw similar posts on other blogs where they made them out of crates premade from JoAnns. This too is expensive b/c the crates are $12 a pop, cheap balsa-type wood, poorly made and small. So it's a lot of money for not good quality.

So what do the hubs and I decide? Make them ourselves from old wood, of course! We went on a search for palettes for a couple of weeks and found these baby's!
 A whole truck load of palettes! Jack pot! They were well worn and had lots of nails. We took them all apart and took the nails out. They left behind rusty nail holes which gave the wood a neat rustic look. So now we have a pile of long pieces of wood.
We made the crates two different sizes so they would stack evenly and we would be able to mix match some vertical and some horizontal. Instead of all the crates being horizontal like the picture above. Ryan figured up a cut list and started cutting away...
 
As he was cutting, I started staining. We chose Kona by Minwax. It was A LOT of wood to stain. 
The only wood we had to buy was for the ends of the crates. We bought three 1x12's.  And here's all the wood laying out to dry after staining and one crate made.
 Now for the fun part! Assembling the rest of the crates: one vertical and one horizontal done.
and 13 crates later...we are done!
The only thing left to do is screw them together to secure them and bring it in the house to decorate! 
And here it is:
We love them and I'm constantly re-arranging them for a different look. It's a great place for cook books, books, keys and little treasures!
And a close up:  
Total cost: around $50 for stain and 3 pieces of wood!
What do y'all think?